
Sign In / Sign Up To Add Wishlist
Wishlist is available for members only. Please sign in or sign up to add your wishlist.
A Practical Guide to Electrical and Data Labelling Templates

Every electrician, comms and maintenance technician knows the job isn’t finished until it's properly labelled. Clear electrical labels do more than tidy up an installation - they help people work safely, reduce errors, support smoother handovers and make future maintenance much easier. A mystery cable is never fun, especially when you’re the one trying to trace where it goes!
From identifying circuits on a switchboard, labelling patch panels in a comms room or applying durable warning labels to plant equipment, the challenge’s usually the same. Labels need to be quick to create, legible and built to last in real site conditions. That’s where a practical mobile workflow, the right electrical label printer, the right template and the right label material all matter.
This guide looks at how Brother electrical label makers and label printers and the Brother Pro Label Tool app can help streamline site work, improve consistency and produce durable labels for electrical and data installations without slowing the job down. Clear labels, fewer hold-ups and less “who labelled this?” questions.
You can also browse the key topics below to quickly find what you need:
- Start with the app and the printer
- Why templates make the workflow better
- Pre-designed vs. Custom labels: Which is best?
- Designing labels that are easier to read and easier to maintain
- A practical approach to panel labels and safety signage
- Step by step: a simple labelling workflow
- Choosing label materials for demanding environments
- Choosing the right labelling setup for the job
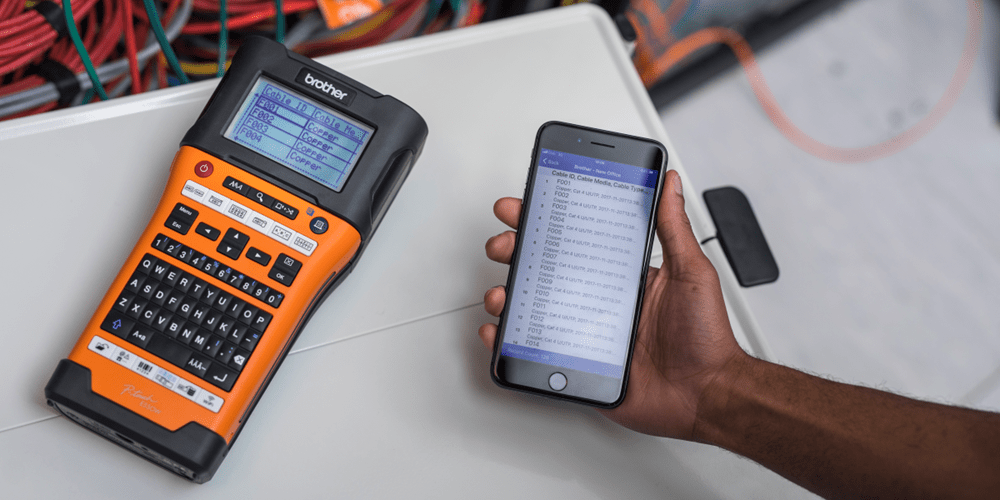
Start with the app and the printer
On a busy site, labelling can sometimes get left until the end. That’s when details are harder to confirm, time is tighter and mistakes are more likely and by that point, nobody wants to be guessing circuit IDs from memory or decoding notes written on the back of a job sheet.Starting with the Brother Pro Label Tool app changes that. Instead of treating labelling as a final admin task, the app makes it easier to create labels at the switchboard, rack, junction box or machine while the installation details are still in front of you. Paired with Brother electrical label makers and label printers, it creates a practical workflow for day-to-day site work. You can label while the information is fresh, not three tasks and one coffee run later!
It also suits the way real jobs unfold. You might need cable flags and wraps in the morning, then wider panel IDs or electrical signage later in the day. A mobile Bluetooth workflow helps you move between those tasks without needing to return to a desk or fixed workstation.
Why templates make the workflow better
Once the workflow is mobile, the next step is consistency. Creating every label from scratch takes time and usually leads to mixed results. Different text sizes, spacing choices and abbreviations can make labels harder to read once the project is complete.
Using built-in templates is a simpler way to work. Instead of manually setting up each label, you can start with layouts designed for common applications such as cable wraps, cable flags, patch panels, faceplates, terminal blocks and panel identification. It takes the guesswork out of formatting, which is exactly where labels tend to go rogue.
That’s particularly useful when multiple technicians or multiple sites need to follow the same system. A shared set of templates, naming rules and tape widths helps labels stay consistent regardless of who prints them. For businesses rolling out repeatable standards, this is one of the easiest ways to improve efficiency and reduce avoidable rework.
Pre-designed vs. Custom labels: Which is best?
Pre-designed templates are often the best starting point for repeat jobs. They work well for common site identifiers, equipment labels, cable IDs, faceplates and any application where a standard electrical panel label template needs to be used consistently across a project. They are the labelling equivalent of having the right bit in the drill before you start!
Custom labels still have their place. They're useful when a site has its own naming structure, when asset information needs extra fields or when labels need to include QR codes, barcodes or customer-specific wording.
In practice, the most effective approach is usually both. Use pre-built templates where the job is repeatable, then customise only where the application genuinely needs more detail.
Designing labels that are easier to read and easier to maintain
Good data and electrical labelling should help someone find the right information quickly, not force them to decode it. If a future technician needs a magnifying glass, a torch and a lucky guess, the label has missed the brief!
For electrical cable labels and network identifiers, clarity usually improves when you keep to a few core rules such as:
- Use one naming convention
- Keep abbreviations controlled
- Place the same fields in the same order
- Position labels consistently
- Keep the most important information first
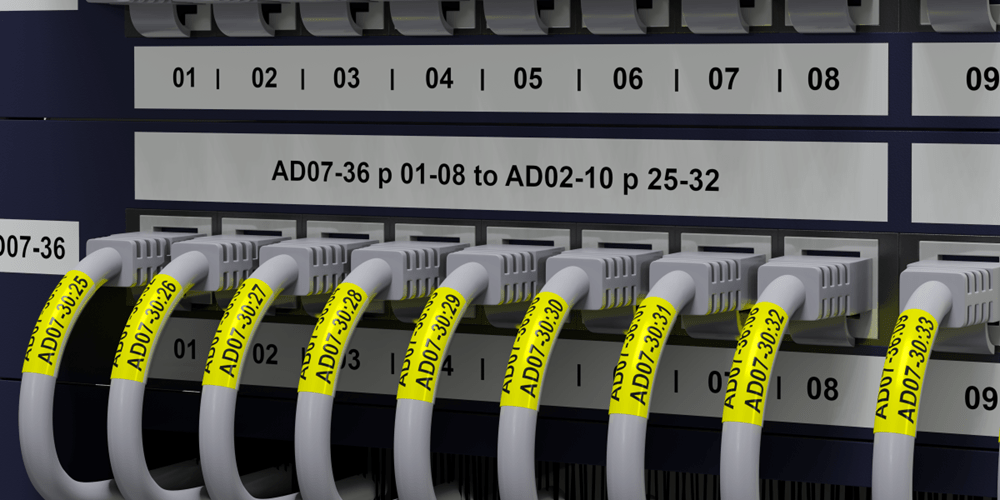
That matters even more in data centres, server rooms and fibre installations where space is tight and text can become hard to read quickly. In those environments, compact labels should carry only the information needed for fast tracing. If more detail is required, it’s often better stored in an asset register or linked digitally through a barcode or QR code.
For machinery and equipment identification, labels should also align with the wider asset system. A tidy format for asset ID, location, equipment class and service reference makes inventory control and maintenance easier over time. Future maintenance teams will thank you. Quietly, probably, but they’ll mean it!
A practical approach to panel labels and safety signage
Panel labels and safety labels need to do one job well: communicate clearly and stay legible over time.
For Australian worksites, that usually means focusing on clear hierarchy, site-approved language, durable media and a size that suits the viewing distance. If hazard symbols or mandatory wording are required, they should always match current site procedures and applicable requirements before rollout.
Wider label formats are often better for switchboards and isolation points because they give you room for more legible, multi-line information. That makes them well suited to warning labels, equipment IDs and larger-format electrical signage.
Used this way, electrical label makers and label printers can help produce clearer, more consistent panel labels and safety signage across the site.
Step by step: a simple labelling workflow
A straightforward process helps teams work faster and stay consistent. It also helps stop labelling from becoming the end-of-job scramble nobody planned for!
- Confirm the application
Identify whether you are labelling power, control, data, fibre, equipment or safety signage - Choose the right format
Use wraps, flags, heat-shrink or wider signage formats based on the cable, component or viewing distance - Start with a template
Use an approved layout to keep formatting, hierarchy and sizing consistent - Follow one naming convention
Keep the wording short, logical and repeatable across every site or project - Print at the point of installation
Using the Brother Pro Label Tool app with Brother electrical label makers and label printers helps reduce note-taking errors and keeps details accurate - Apply labels consistently
Place labels in the same position every time and only apply them to clean, dry surfaces - Review before handover
Check readability, placement and naming consistency as well as compliance in accordance with Australian Standards before sign-off

Choosing label materials for demanding environments
The template is only half the job, the label material still needs to suit the environment. A beautifully formatted label will not help much if it lifts, fades or gives up after the first tough day on site!
In industrial and trade settings, electrical labels and signage may be exposed to oil, grease, chemicals, abrasion, UV, moisture and temperature swings. In those conditions, the labels need to stay attached and stay readable long after installation.
Surface type matters too. Powder-coated metal, rough plastic and textured housings can all behave differently. Matching the adhesive and label construction to the surface helps improve bond strength and long-term performance.
Explore Brother's wide selection of TZe Pro Tapes to leave the mark of a trusted tradie. When combined with the right consumables and the Brother Pro Label Tool app, our electrical label makers and label printers can support a wide range of electrical and datacom labelling applications, from switchboards and plant equipment to cable IDs and outdoor enclosures. So whether the label is facing dust, heat, moisture or the daily knocks of site life, you can match the media to the job.
Choosing the right labelling setup for the job
The best setup depends on the volume and type of work you do most often. There's no point overcomplicating a simple job, and there's definitely no point under-equipping a busy one!
For everyday electrical and data work, a portable device like the Brother PT-E920BT P-touch CUBE Pro Label Maker or a handheld electrical label maker like the PT-E560BTVP Pro Label Maker paired with the Brother Pro Label Tool app offers a practical balance of convenience and capability for on-site labelling. Watch the video below to see the PT-E920BT in action using the Brother Pro Label Tool app.
For larger projects that require higher-volume output, desktop connectivity or longer runs of sequential asset IDs, a label printer like the Brother PT-P950NW Label Printer may be the better fit. While both the PT-E920BT and PT-P950NW support labels up to 36mm wide, the PT-P950NW is better suited to more demanding labelling workflows where speed, connectivity and output volume are key considerations.
A smarter way to label on site with Brother
The best electrical labelling systems are practical from the start. They begin with the right workflow, then you can support it with the right templates, the right materials and the right device.
For electrical and datacom work, that usually means choosing the right labels and label printer for the environment, standardising where possible and making sure electrical labels are legible long after installation. When that is done well, electrical signage becomes easier to create, easier to understand and easier to maintain.
Build a better labelling workflow with the Brother Pro Label Tool app and electrical label makers and label printers. See how they add real value by helping your team create clear, durable and consistent electrical labels.
Got any questions? Feel free to speak to a Brother labelling specialist, our team is always happy to help you.
Comments

Faster Electrical and Datacom Labelling: Save Time on Cables, Panels & Assets
Save time on electrical and datacom labelling with Brother label makers, batch printing, cable ID templates and durable TZe Pro tapes.
Choosing the Best A3 Printer: Ultimate Guide
Compare costs, features and top Brother A3 inkjet printers for home, office and business use.

Finding the best printer for home use
Discover the best home office printers in Australia. Compare top Brother home printer models for families, students, remote work and budget-friendly printing.

Resource Library
Explore our range of eBooks, Whitepapers & Case studies
Be the first to receive ongoing exclusive offers and the latest news on our products and services directly in your inbox!