
FAQ: Unable to scan from a Windows computer
Step 1: Check for errors on the scanner, reboot devices and confirm the computer is not connected to a VPN
Ensure that there are no error messages on the Brother device. If there is an error on the Brother device, the error will need to be resolved by following the steps in the User Guide for your model. Click here to find your user guide
Before completing the steps below, restart the computer, the Brother device and your wireless router/wireless range extenders if you are scanning through a network. Wait 2 minutes after restarting the devices, then try scanning.
After confirming that there are no error messages on the Brother device, restart the computer, the Brother device, and your wireless router/wireless range extenders if you are scanning through a network. Wait 2 minutes after restarting the devices, then try scanning from the computer.
If you are using a VPN connection on the computer, you will need to disable the VPN connection to be able to scan over a network.
Continue to Step 2 if you are not able to scan after completing the above steps and the Brother device is connected to a network. If the Brother device is connected with a USB cable to your computer, continue to Step 3.
**Please note that Brother drivers are not compatible with ARM processors on Windows. If your computer is using an ARM processor, the drivers and software will not install or function. However, you may be able to use a built-in generic Windows driver with limited functionality.
Step 2: Confirm the Brother device is connected to the Network
For Network Users, confirm that your Brother device is connected to the network by completing the steps in the below video.
Wireless Connection
Wired (Ethernet) Connection
Click this link if you prefer text-based instructions for the above video.
Once you have confirmed that the Brother device is connected to the network, continue to Step 3.
Step 3: Confirm Brother Utilities is installed
Click on the Brother Utilities icon on the desktop. If the icon does not appear, click on your Windows Start icon in the bottom left corner of the screen and under the letter B open the Brother folder and select Brother Utilities.
If Brother Utilities does not exist, the Full Driver and Software package is not installed. Download and install the Driver and Software Package from our website.
With Brother Utilities open click on the drop down to make sure that the correct model machine is listed. If your model is installed via a Wireless or Ethernet connection, it should have LAN listed after the model's name.
If your model supports the Brother iPrint&Scan application, continue to Step 4. Click the link below for the list of supported models:
https://support.brother.com/g/s/id/os/ipswm.pdf
If your model does not support the Brother iPrint&Scan application, continue to Step 5.
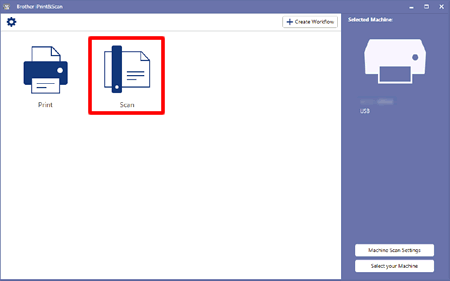
Step 4: Scan from the Brother iPrint&Scan application
Open Brother Utilities from either your Desktop, or from within the Windows Start menu under Brother.
If Brother iPrint&Scan does not exist on your computer, download and install the iPrint&Scan application from our website.
With iPrint&Scan open, click Select your Machine. Select the tab for the connection type that you are using and then select your Brother device from the list and press OK. Then follow the steps below to perform a scan:
- Load the document
- Click Scan
- Choose your settings. To view all available settings, click All Settings
- Click Scan
- Scanning will start. If you want to add more pages to the scan, load the paper and click Add Pages
- After scanning all the pages, click Save to PC
- Configure the File Name, Save folder, File Type, and then click Save.
If you can scan from the iPrint&Scan application and are wanting to scan using the scan feature on the machine, click Machine Scan Settings. If prompted, select Setup, then Setup again and then Completed. You can now try scanning from the Brother machine.
If you are not able to scan from the iPrint&Scan application, or from the machine directly, continue to Step 6.
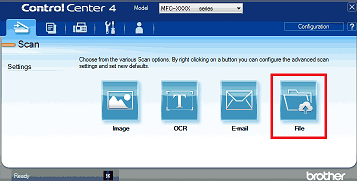
Step 5: Scan from the Brother Control Center 4 application
Within Brother Utilities, select your model that you are wanting to scan from in the Model drop down list, then Click Scan > Control Center 4.
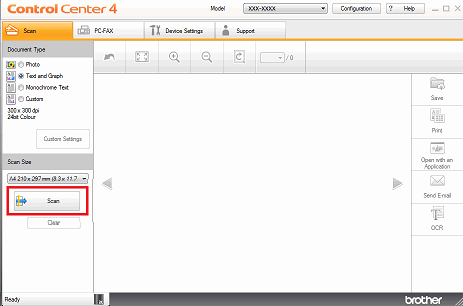
Advanced Mode
- Load the document
- Click the Scan tab
- Click the File button
- Select your settings
- Click Scan.
Home Mode
- Load the document
- Click the Scan tab
- Click Scan
- After the scan completes, click Save on the right side of the window
- Select your settings
- Click OK
If you can scan from the Control Center 4 software, the drivers are installed and functioning correctly. You can close this file and use the scanner.
If you are not able to scan from Control Center 4, or not able to scan directly from the machine, continue to Step 6.
Step 6: Browse for the scanner on the network/Connect USB cable
Connected via a Network:
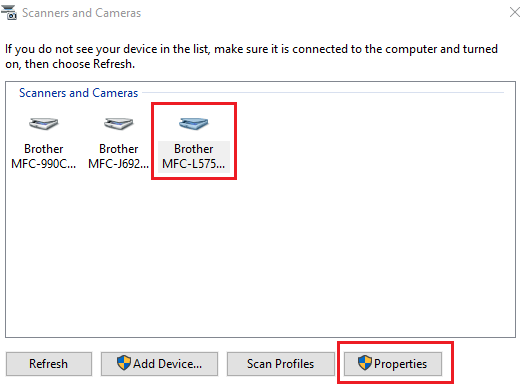
1. Open Scanner Properties (How to open scanner properties)
**If you do not see your model within Scanners and Cameras, you will need to uninstall and reinstall the Brother Driver and Software package.
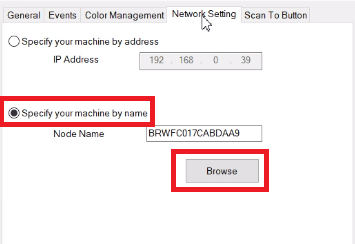
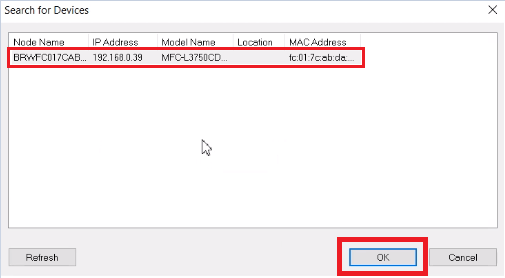
2. The Scanner Properties dialogue box appears. Click the Network Setting tab and choose Specify your machine by name, and then click Browse.
3. Select your Brother model and click OK.
**If you do not see your model in the list after clicking Refresh, it is likely that the computer cannot communicate with the Brother device through the network. Continue to Step 8.
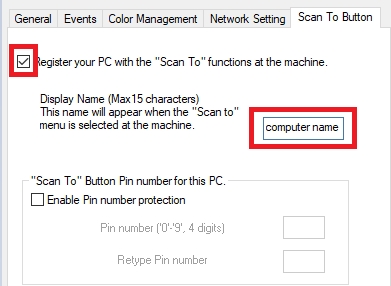
4. Click the Scan To Button tab and ensure that Register your PC with the "Scan To" functions at the machine is ticked and a Display Name has been entered.
5. Click the Events tab, ensure that each of the Events in the drop down list are set to the Brother program that you are using e.g. “Start this Program Control Center 4” if using Control Center 4, or “Start this Program iPrint&Scan” if using iPrint&Scan.
6. Click OK to close the scanner properties.
Connected via USB:
1. Open Scanner Properties (How to open scanner properties)
**If you do not see your model within Scanners and Cameras, ensure that the USB cable is connected correctly at both ends and that the Brother device is powered on, then press Refresh. If the model still does not appear, try connecting the USB cable to a different USB port on the computer (it should be connected directly to the computer, do not connect it through a USB hub or extension cable) You can also try using another USB cable. Then press Refresh.


2. The Scanner Properties dialogue box appears. Click the Events tab, ensure that each of the Events in the drop down list are set to the Brother program that you are using e.g. “Start this Program Control Center 4” if using Control Center 4, or “Start this Program iPrint&Scan” if using iPrint&Scan.
3. Click OK to close the scanner properties.
Try scanning from iPrint&Scan or Control Center 4 again.
If you are able to scan from the software you can close this page and use the scanner.
If you are not able to scan from Control Center 4, or from the scan function on the machine, continue to Step 7.
If you are not able to scan from iPrint&Scan, continue to Step 8.

Step 7: Delete the TWAIN temporary files
Navigate to the folder path below. Note that you may need to show the hidden files and folders:
C:\Users\(User-Name)\AppData\Local\Temp
Delete the following 4 files:
TWAIN.LOG
Twain001.Mtx
Twunk001.MTX
Twunk002.MTX
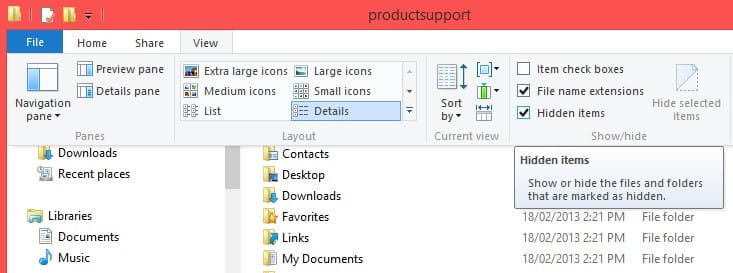
If “AppData” folder does not appear please see below to Show Hidden Files and Folder
Click on the VIEW menu and select the option for Hidden items.
Once the files have been deleted, empty the recycling bin and then restart the computer. Then try scanning from Control Center 4 again.
If you can scan from the Control Center 4 software you can close this file and use the scanner.
If you are not able to scan from Control Center 4, continue to Step 8.
Step 8: Ensure Windows is set to Private Network and Disable Security Software
Click (Start) > (All apps >) Windows System > Control Panel. Within the Control Panel click Network and Internet and then select Network and Sharing Center.
Your network type will be listed on the left. It will either be Private, Public or Domain. If it is set to Public, follow the steps here on the Microsoft website to change it to Private.
In some situations, you may have more than one connection shown here, in that case you may be running a VPN. If so, please disconnect the VPN.
Try scanning again.
If the scan fails, 3rd party security software may be causing an issue. Temporarily disable any security software / firewall by opening the system task tray at the bottom right of your computer screen. A list of applications that are running will appear. Right click on the Security software that you are running and a list of options for Disabling, Pausing or Turning Off should appear for you to select.
Try scanning again.
If the scan completes successfully, you can close this page.
If the scan fails, continue to Step 9.
Step 9: Uninstall and Reinstall the Driver and Software Package
Open the Brother Utilities icon on the desktop.
If the icon is not on your desktop, click on your Windows Start icon in the bottom left corner of the screen and under the letter B open the Brother folder and select Brother Utilities.
If Brother Utilities does not exist, go to the end of this step and click the link to download the Driver and Software Package for your model.
With Brother Utilities open, click on the Model drop down to make sure that the correct model is selected, then click on the Tools menu and then click the Uninstall icon.
Click OK to begin the uninstall process.
If the Brother device is connected via USB cable to the computer, disconnect the USB cable and do not reconnect until instructed to during the installation.
Restart the computer after the uninstall has completed and then download and install the Driver and Software Package for your model from our global support website here.
Sign In / Sign Up To Add Wishlist
Wishlist is available for members only. Please sign in or sign up to add your wishlist.
