
FAQ: Unable to print from Mac OS
Step 1: Check for errors on the printer, reboot devices and confirm the computer is not connected to a VPN
Ensure that there are no error messages on the Brother device. If there is an error on the Brother device, the error will need to be resolved by following the steps in the User Guide for your model. Click here to find your user manual
After confirming that there are no error messages on the Brother device, restart the computer, the Brother device, and your wireless router/wireless range extenders if you are printing through a network. Wait 2 minutes after restarting the devices, then try printing from the computer.
If you are using a VPN connection on the computer, you will need to disable the VPN connection to be able to print over a network.
Continue to Step 2 if you are not able to print after completing the above steps and the Brother device is connected to a network. If the Brother device is connected with a USB cable to your computer, continue to Step 3.
**Please note that Brother drivers are not compatible with ARM processors on Windows. If your computer is using an ARM processor, the drivers and software will not install or function. However, you may be able to use a built-in generic Windows driver to print with limited functionality.
Step 2: Confirm the Brother device is connected to the Network
For Network Users, confirm that your Brother device is connected to the network by completing the steps in the below video.
Click this link if you prefer text-based instructions for the below videos.
Wireless Connection
Wired (Ethernet) Connection
Once you have confirmed that the Brother device is connected to the network, please continue the steps within your version of Mac OS below.
Step 3: Check that the Brother Printer is installed correctly
Click the Apple menu at the top left of the computer screen and select System Preferences.
Click the Printers & Scanners icon.
Select the Brother printer from the list on the left.
Ensure that next to Kind it has Brother printer model name CUPS
If the correct Brother model with CUPS is listed, continue to Step 5.
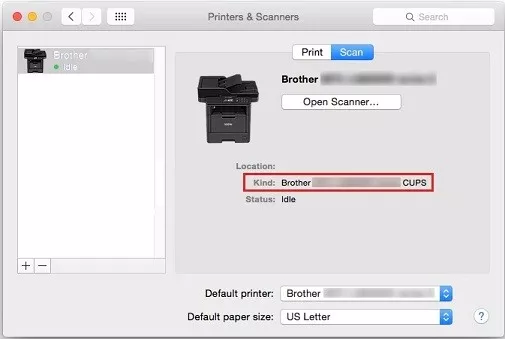
If next to Kind, it has Brother [model name] AirPrint, or you do not have the Brother printer model listed, Continue to Step 4.
Step 4: Add the printer using the Brother CUPS driver
Follow the steps below to remove and add the printer using the correct Brother CUPS driver. If your printer model is not listed, start at Step C.
Select the Brother printer from the list on the left.
a. Click the "-" button which is located below the Printers section.
b. Choose Yes to delete the printer.
c. Click the "+" button which is located below the Printers section.
d. Click the Default icon which is located at the top of the dialogue box.
e. Select your Brother model from the Printer Name list.
f. Make sure that Your model name/series with CUPS is selected in the Use list.
g. Click Add. The printer is now available in the Printers & Scanners list.
Once the printer has been added with the CUPS driver, continue to Step 5.
If you do not have the Brother model with CUPS available to select in the Use list, download and install the Printer Driver from our website here. Then add the printer by following from Step C above and then continue to Step 5.
If you do not see your Brother model in the list when trying to add the printer, continue to Step 6.
Step 5: Print a test page from the computer
Within the Printers & Scanners window, select your Brother printer from the list on the left, then click Open Print Queue. Click Printer at the top left of the computer screen and then click Print Test Page.
If the printer prints the test page, you can close this file and use the printer.
If the printer does not print the test page, continue to Step 6.
Step 6: Check connections and disable firewall
USB connection:
Ensure that the USB cable is connected correctly at both ends.
Try connecting the USB cable to a different USB port on the computer (it should be connected directly to the computer, do not connect it through a USB hub or extension cable).
Try another USB cable
If you are still not able to print, continue to Step 7.
Network connection (Wireless/Ethernet):
Click the Apple menu at the top left of the computer screen and select System Preferences.
Click the Network icon.
Your network connections will appear on the left. The connections that are currently connected will say Connected. Ensure that there is only one connected there e.g. Wireless or Ethernet, not both at the same time. If more than one is connected, disconnect one of them by either turning off Wi-Fi on the computer, or disconnecting the Ethernet cable from the computer.
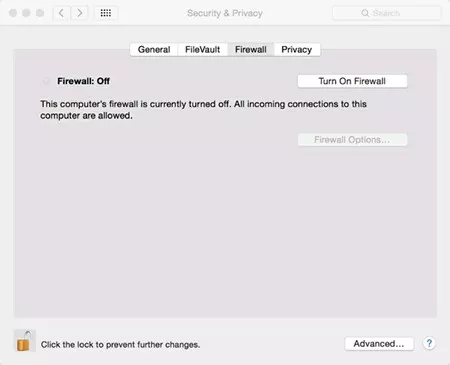
If you are still not able to print, follow the steps below to disable the firewall.
Within System Preferences click Security and Privacy. Click the Firewall tab If the Firewall is On, click the button to Turn Off Firewall. Note that if the button is greyed out, click the padlock at the bottom left of the window to unlock the setting.
If you have third party firewall software installed, icons for the security software can typically be found at the top right corner of your computer screen. Click the icon and select Disable, Turn Off, Pause Protection etc.
If you are still not able to print the test page, continue to Step 7.
Step 7: Uninstall and reinstall the Brother printer driver
To uninstall the Brother Drivers, follow the steps in this link.
Once the Drivers have been uninstalled, empty the Trash and restart the computer.
When the computer is back on, download and install the Printer Driver here.
Then Follow the steps at Step 4 and Step 5 again to add the printer and print a test page from the computer.
Step 3: USB - Print using the Brother iPrint&Scan software
Printing with a USB connection on Mac OS 11 or later should be done using the Brother iPrint&Scan software.
Click Go > Applications, and ensure that iPrint&Scan is in the list of Applications. If iPrint&Scan is not in the list, download and install it from the Apple App Store here.
Open the iPrint&Scan software from within your Applications folder. In iPrint&Scan, click Select your Machine at the lower right corner of the Window. Click the USB tab and then select the Brother model that appears in the list and press OK.
If you do not see the model appear, try the following:
Ensure that the USB cable is connected correctly at both ends.
Try connecting the USB cable to a different USB port on the computer (it should be connected directly to the computer, do not connect it through a USB hub or extension cable).
Try another USB cable
Once the model has been selected, click the Print button, then click PDF to print a PDF file, or Photo to print an image file such as JPEG or PNG. Select the file that you want to print and then click Open.
For PDF files, select the pages that you want to print and then press Next.
Select your desired settings and then press Print.
Step 4: Network - Check that the Brother Printer is installed correctly
Click the Apple menu at the top left of the computer screen and select System Preferences.
Click the Printers & Scanners icon.
Select the Brother printer from the list on the left.
Ensure that next to Kind it has Brother printer model name AirPrint
If the correct Brother model with AirPrint is listed, continue to Step 6.
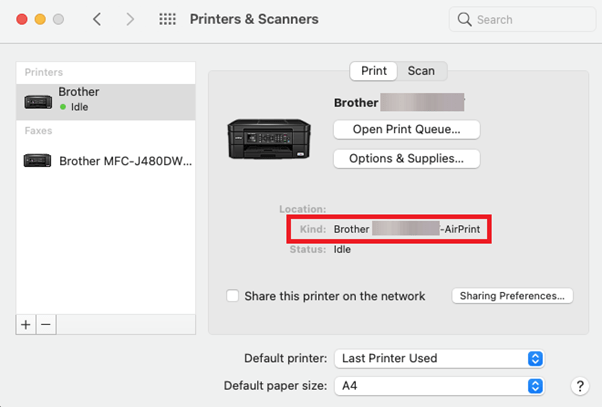
If next to Kind, it does not have “Brother [model name] AirPrint”, or you do not have the Brother printer model listed, Continue to Step 5.
Step 5: Add the printer
Follow the steps below to remove and add the printer. If your printer model was not listed at step 4, start at Step C below.
Select the Brother printer from the list on the left.
a. Click the "-" button which is located below the Printers section.
b. Choose Yes to delete the printer.
c. Click the "+" button which is located below the Printers section.
d. Click the Default icon which is located at the top of the dialogue box.
e. Select your Brother model from the Printer Name list.
f. The “Use” field should have “AirPrint” or your model name.
g. Click Add. The printer is now available in the Printers & Scanners list.
Once the printer has been added, continue to Step 6.
If you do not see your Brother model in the list when trying to add the printer, continue to Step 7.
Step 6: Print a test page from the computer
Within the Printers & Scanners window, select your Brother printer from the list on the left, then click Open Print Queue. Click Printer at the top left of the computer screen and then click Print Test Page.
If the printer prints the test page, you can close this file and use the printer.
If the printer does not print the test page, continue to Step 7.
Step 7: Check connections and disable firewall
Network connection (Wireless/Ethernet):
Click the Apple menu at the top left of the computer screen and select System Preferences.
Click the Network icon.
Your network connections will appear on the left. The connections that are currently connected will say “Connected”. Ensure that there is only one that is “connected” there e.g. Wireless or Ethernet, not both at the same time. If more than one is connected, disconnect one of them by either turning off WiFi on the computer, or disconnecting the Ethernet cable from the computer.
If you are still not able to print, follow the steps below to disable the firewall.
Within System Preferences click Security and Privacy. Click the Firewall tab If the Firewall is On, click the button to Turn Off Firewall. Note that if the button is greyed out, click the padlock at the bottom left of the window to unlock the setting.
If you have third party firewall software installed, icons for the security software can typically be found at the top right corner of your computer screen. Click the icon and select Disable, Turn Off, Pause Protection etc.
If you are still not able to print the test page, continue to Step 8.
Step 8: Reset the Print System
Reset the Print System:
Click the Apple menu at the top left of the computer screen and select System Preferences.
Click the Printers & Scanners icon.
Hold the “Control” key on the keyboard and click on the list of printers on the left. Click Reset printing system from the menu that appears. Then click Reset from the prompt that appears.
Then Follow the steps at Step 4 and Step 5 again to add the printer and print a test page from the computer.
