
FAQ: Unable to print from a Windows computer
Step 1: Check for errors on the printer, reboot devices and confirm the computer is not connected to a VPN
Ensure that there are no error messages on the Brother device. If there is an error on the Brother device, the error will need to be resolved by following the steps in the User Guide for your model. Click here to find your user manual
After confirming that there are no error messages on the Brother device, restart the computer, the Brother device, and your wireless router/wireless range extenders if you are printing through a network. Wait 2 minutes after restarting the devices, then try printing from the computer.
If you are using a VPN connection on the computer, you will need to disable the VPN connection to be able to print over a network.
Continue to Step 2 if you are not able to print after completing the above steps and the Brother device is connected to a network. If the Brother device is connected with a USB cable to your computer, continue to Step 3.
**Please note that Brother drivers are not compatible with ARM processors on Windows. If your computer is using an ARM processor, the drivers and software will not install or function. However, you may be able to use a built-in generic Windows driver to print with limited functionality.
Step 2: Confirm the Brother device is connected to the Network
For Network Users, confirm that your Brother device is connected to the network by completing the steps in the below video.
Click this link if you prefer text-based instructions for the below videos.
Wireless Connection
Wired (Ethernet) Connection
Once you have confirmed that the Brother device is connected to the network, continue to Step 3.
Step 3: Check that you have a printer icon installed for your Brother device
Click on the Brother Utilities icon on the desktop. If the icon is not on your desktop, click on your Windows Start icon 
With Brother Utilities open, click on the Model drop down to make sure that the model of your Brother device is Listed. If your model is installed via a Wireless or Ethernet connection, it should have LAN after the model's name.
If your model is not listed in the Model drop down, or you do not have Brother Utilities installed on the computer, download and install the Driver and Software Package for your model from our global support website here.
After you have confirmed that the Brother device is correctly listed within Brother Utilities, open the Control Panel on the computer:
Click
Within the Control Panel click Hardware and Sound > Devices and Printers. You should have an icon for your Brother printer model listed here.
If you do not have an icon for your Brother printer model, go to Step 7.
If you do have a printer icon for your Brother printer model, continue to Step 4.
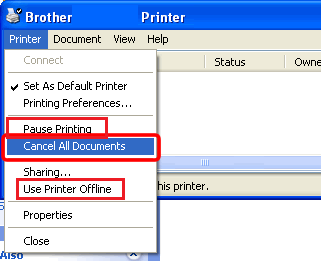
Step 4: Cancel all documents from the Print Queue and ensure that the printer is not paused
Right click the icon for your Brother printer model and select See What's Printing. Click Printer at the top left of the new window that opens and then select Cancel All Documents. Also ensure that Pause Printing and Use Printer Offline do not have a tick next to them in this list. If there is a tick next to Pause Printing, or Use Printer Offline, left click them to un-tick.
Continue to Step 5.
Step 5: Check that the Port and Driver are set correctly
**If you have more than one printer icon for your Brother printer model, check the following for each icon.
Right-click your Brother printer icon and select Printer Properties.
Click the Advanced tab at the top.
The Driver drop down box should match the name of your Brother printer model e.g. If your model is a MFC-L3750CDW, the Driver drop down should be set to MFC-L3750CDW.
Select the correct Driver for your Brother printer model and click the Apply button (if available).
Click the Ports tab at the top.
The Port that should be ticked will depend on how the Brother device is connected to your computer. Examples are below of what the port should start with for each connection type:
USB connection = USB
Wireless connection = BRW
Ethernet Connection = BRN
WIFI Direct = BRX
Tick the correct Port for your conection type from the list and click the Apply button (if available).
If you do not have the correct Brother Driver in the Driver list, or if the correct Port for your connection type is not in the Port list, continue to Step 7.
If the correct Port and Driver are selected, click the General Tab at the top of the Printer Properties and then click Print Test Page. If the Windows Test Page is printed, the Printer is installed and operating correctly. Ensure that the printer is set as the default printer by right clicking the printer icon and selecting Set as default. You can then close this page and use the printer.
If using a USB connection and you are unable to print, try the following:
- Make sure that the USB cable is connected correctly at both ends
- Try connecting the USB printer cable to another port on the computer and not via a USB Hub or extension cable
- Try another USB cable and ensure the cable is less than 2m in length
Continue to Step 6 if you are still not able to print.
Step 6: Ensure Windows is set to Private Network and Disable Security Software
Click
Your network type will be listed on the left. It will either be Private, Public or Domain. If it is set to Public, follow the steps here on the Microsoft website to change it to Private.
In some situations, you may have more than one connection shown here, in that case you may be running a VPN. If so, please disconnect the VPN.
Try printing a Windows Test Page again.
If the test page does not print, 3rd party security software may be causing an issue. Temporarily disable any security software / firewall by opening the system task tray at the bottom right of your computer screen. A list of applications that are running will appear. Right click on the Security software that you are running and a list of options for Disabling, Pausing or Turning Off should appear for you to select.
Try printing again.
If the test page prints successfully, you can close this page.
If the test page does not print, continue to Step 7.
Step 7: Remove Printer icon and Uninstall / Reinstall the Full Driver and Software Package.
Click
If you have multiple icons for your Brother Printer model, Remove all of them.
Close the Devices and Printers window and then open the Brother Utilities icon on the desktop.
If the icon is not on your desktop, click on your Windows Start icon
If Brother Utilities does not exist, go to the end of this step and click the link to download the Driver and Software Package for your model.
With Brother Utilities open, click on the Model drop down to make sure that the correct model is selected, then click on the Tools menu and then click the Uninstall icon.
Click OK to begin the uninstall process.
If the Brother device is connected via USB cable to the computer, disconnect the USB cable and do not reconnect until instructed to during the installation.
Restart the computer after the uninstall has completed and then download and install the Driver and Software Package for your model from our global support website here.
Sign In / Sign Up To Add Wishlist
Wishlist is available for members only. Please sign in or sign up to add your wishlist.
