


Sign In / Sign Up To Add Wishlist
Wishlist is available for members only. Please sign in or sign up to add your wishlist.

FAQs: Printing on Roll Paper
Please note these FAQs are applicable to
MFC-J6959DW only.
MFC-J6959DW only.
-
What is roll paper printing?
Roll paper printing uses continuous paper loaded from a paper roll installed into the printer, unlike cut-sheet printing which uses individual sheets. This enables printing of banners, signage, and posters of various lengths without manually feeding each sheet.
- Use Tray #2 to print on roll paper (Width: 297 mm / Outer diameter: 90 mm or less).
- Use Roll paper only when printing from a computer or when printing from a Mac computer using AirPrint. Roll paper cannot be used when copying or faxing.
- Windows: To print on roll paper, the Brother printer driver must be installed. The Brother drivers and software are available via the Downloads page at support.brother.com.
- If the Check Paper setting is set to On and the paper tray is pulled out of the machine, a message appears on the LCD, allowing the paper size and paper type to be changed.
- When a different paper size is loaded in the tray, the Paper Size setting must be changed in the machine or the paper size setting on the computer. This enables the machine to automatically feed paper from the appropriate tray if Auto Tray Select has been set in the printer driver for Windows or on the machine.
- If the ink cartridges have reached the end of their lives when you are printing on Roll paper, they can be replaced with new ink cartridges of the same colour and printing can continue. The colour tone may be different after the ink cartridge replacement.
Supported on: MFC-J6959DW only
-
How to load Tray 2 for roll paper printing?
- If the paper support flap is open, close it, and then close the paper support tray.
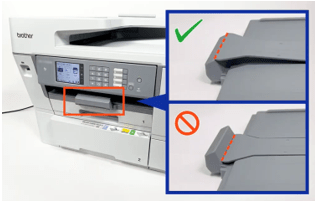
- Pull Tray #2 completely out of the machine as shown below.
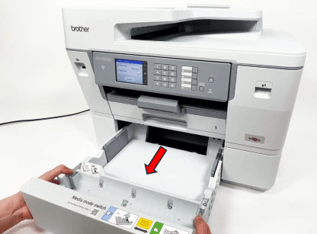
Remove all paper from Tray #2 when loading Roll paper. DO NOT load A4 size paper and Roll paper at the same time.
- Gently press and slide the paper width guides to extend them to the maximum width.
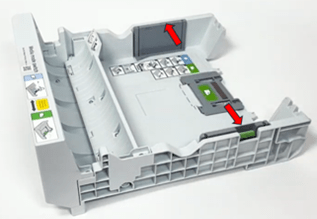
- Set the switch flap to Roll Paper mode, as shown. The Roll Paper mode side of the flap is marked in blue.
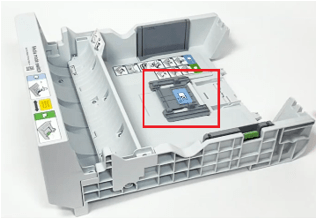
- Gently load the Roll paper with the leading edge down and facing the front of the tray, as shown.
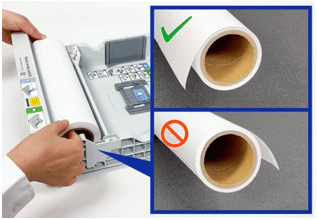
- Place your fingers on both sides of the Roll paper and rotate the roll in the direction of the arrow, as shown. Continue to rotate the roll until the paper feeds through the paper slot in the base of the tray and touches the back edge of the tray.
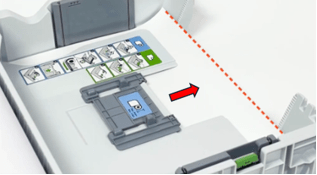
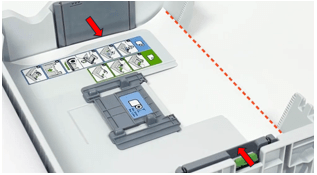
- Gently adjust the paper width guides to fit the paper. Make sure the paper guides touch the edges of the paper.
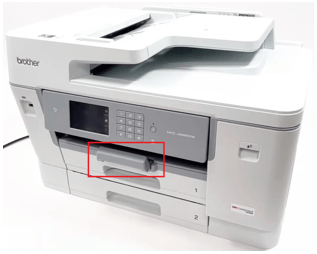
- Slowly push Tray #2 completely into the machine.
- Make sure that the paper support tray is closed.
- If the Check Paper setting is On, pulling out the paper tray displays an option on the LCD to change the paper size and paper type. Change the paper size setting to 297 mm Roll. If the option does not appear, the setting can be changed in [Settings] > [All Settings] > [General Setup] > [Tray Setting].
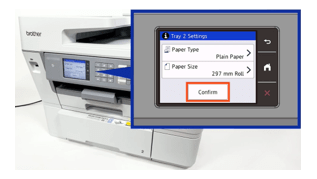
- If the paper support flap is open, close it, and then close the paper support tray.
-
How to print on roll paper? (Windows)
- Select the Print command in the application.
- Select the printer model name, then click the printer Properties or Preferences button. The printer driver window appears.
- Click the Basic tab.
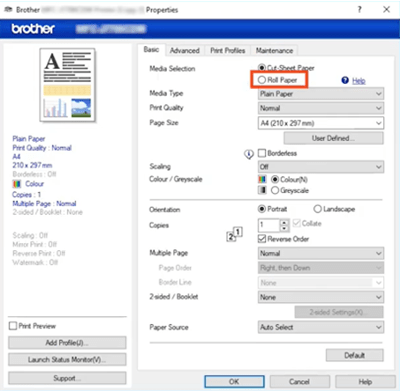
- In the Media Selection field, select Roll Paper. The Roll Paper Settings window appears.
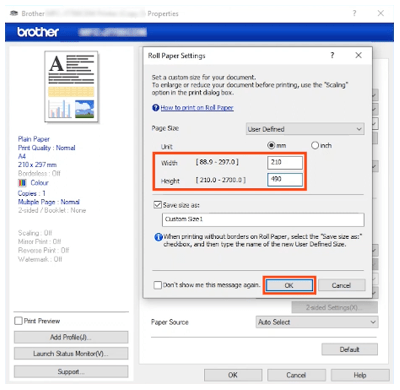
- Click the Page Size drop-down list, and then select User Defined.
- Enter the page width and height specified in the application.
- Select the Save size as checkbox, then enter a name for the paper size.
- Click OK to apply the page size settings and close the window.
- Click the Media Type drop-down list, then select the type of paper being used.
- Click the Scaling drop-down list, then select the option to enlarge or reduce the page size, if required.
- For Colour/Greyscale, select the Colour or Greyscale option.
- In the Orientation field, select Portrait or Landscape to set the print orientation.
- Enter the number of copies required (1-999) in the Copies field.
- Change other printer settings, if required.
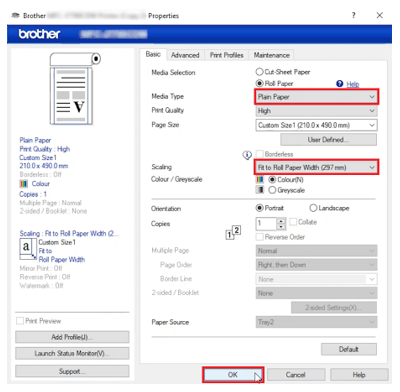
- Click OK.
- If the instruction window for loading paper appears, read it, and then click OK.
- Complete the print operation.
You can also check out the video below for visual guidance on the step-by-step instructions:
-
How to print on roll paper? (macOS)
- Open the document in the application.
- Click File > Page Setup. The Page Setup window appears.
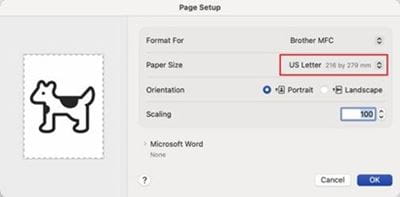
- Click the Paper Size drop-down list, and then select Manage Custom Sizes.
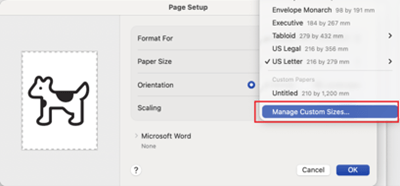
- Click the + icon, then enter the following details for the document, and then click OK
- Enter a name for the custom paper size.
- Enter the custom paper size. Width: (297 mm or less) and Height: (210 mm to 2700 mm).
- Enter Margins.

- Select the custom paper size that was created and choose the orientation, then click OK.
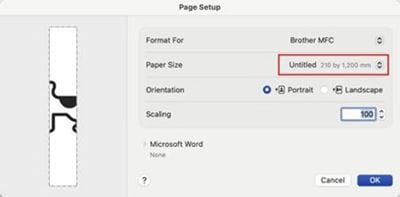
- Click File > Print.
- Make sure the machine is selected. If a different machine or no machine is selected, click the Printer menu, then select the correct machine.
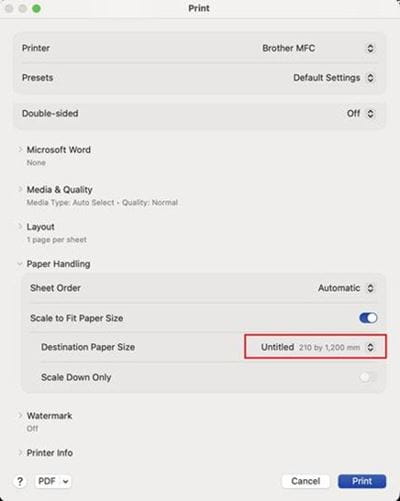
- Under Paper Handling, enable Scale to Fit Paper Size.
- Click Destination Paper Size, then select the custom paper size that was created in step 2.
- Select any other printer settings, if required.
- Click Print to complete the print operation.
-
Why does my machine print only part of the page when printing on roll paper? (Windows)
If your machine prints only part of the page and leaves the rest of the page blank when printing on Roll paper, check the following:
Cause 1: The page size set in the printer driver is not the same as the page size set in your application.
For more information on how to print on Roll paper, see the guide How to Print on Roll Paper (Windows).
Cause 2: The page resolution is too high.
If you print a document longer than 1380 mm (54.3 in.) and the machine prints only part of the page and leaves the rest of the page blank, change the input resolution to print the whole page.
To change the input resolution, follow these steps:
- Select the model's name, and then click the printer's properties or preferences button. The printer driver window appears.
- Click the Advanced tab.
- Click the Other Print Options button. The Other Print Options window appears.
- In the Printer Function field, select Input Resolution.
- Select the Lower the Input Resolution automatically checkbox.
- Click OK to apply the settings and to close the window.
If this option is selected, it may have an impact on the printing speed and print quality.
Check the Remaining Roll Paper Length:
- Check that there is enough roll paper remaining before printing.
- If there is not enough roll paper for the selected page length, the machine may stop printing before the page is complete.
- Even if the remaining amount of Roll paper is enough for the page length, the machine may leave the page blank at the end of the print result.
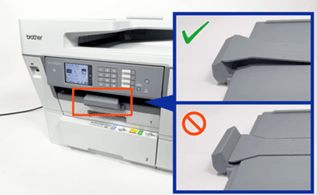
Paper Support Closed:
FAQs: Printing on Long Paper
Please note these FAQs are applicable to
MFC-J6959DW, MFC-J6960DW, MFC-J6975DW, MFC-J5110DW and MFC-J5115DW only.
MFC-J6959DW, MFC-J6960DW, MFC-J6975DW, MFC-J5110DW and MFC-J5115DW only.
-
What is long paper printing?
Long paper printing uses individual long sheets of paper manually fed through the Multi-Purpose (MP) Tray.
- Use the MP tray to print on Long paper.
- Use Long paper only when printing from your computer or when printing from a Mac computer using AirPrint. Do not use Long paper when copying or faxing.
- If the Check Paper setting is set to On and the paper is set in the MP Tray, a message appears on the LCD, allowing the paper size and paper type to be changed.
- When a different paper size is loaded in the tray, the Paper Size setting must be changed in the machine or the paper size setting on the computer. This enables the machine to automatically feed paper from the appropriate tray if Auto Tray Select has been set in the printer driver for Windows or on the machine.
- If the ink cartridges have reached the end of their lives when printing on long paper, they can be replaced with new ink cartridges of the same colour and printing can continue. The colour tone may be different after the ink cartridge replacement.
Supported on: MFC-J6959DW, MFC-J6960DW, MFC-J6975DW (Width 88.9 mm - 297 mm / Height 431.9 mm - 1200 mm), MFC-J5110DW and MFC-J5115DW (Width: 88.9 - 215.9 mm / Height: 355.7 - 1200 mm)
-
How to load the MP Tray when printing on long paper?
- Open the MP Tray and keep it open until printing is complete. The MP Tray can be closed after printing has finished.
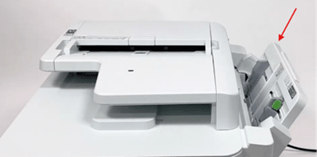
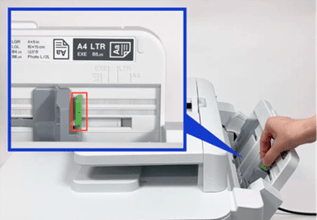
- Gently press and slide the MP tray paper guides to match the width of the paper you are using.
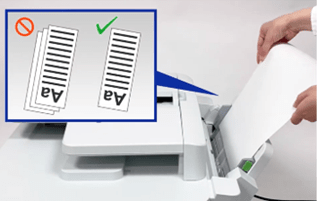
- Load one sheet only in the MP Tray, with the printing surface facing up. Do not load more than one sheet at a time.
Using both hands, gently push the sheet into the MP Tray until the leading edge touches the paper feed rollers. The LCD displays [Manual Feed Slot ready]
Supported long paper size:
MFC-J6959DW, MFC-J6960DW and MFC-J6975DW (Width: 88.9 mm - 297 mm / Height: 431.9 mm - 1200 mm).
MFC-J5110DW and MFC-J5115DW (Width: 88.9 - 215.9 mm / Height: 355.7 - 1200 mm)
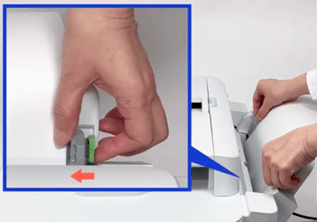
- Using both hands, gently adjust the MP tray paper guides to fit the paper.
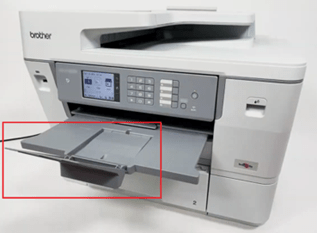
- Pull out the paper support tray until it locks into place, and then unfold the paper support flap
- Change the paper size setting to User Defined Size and enter the actual size using the machine's touchscreen. To access the tray settings, press [Settings] > [All Settings] > [General Setup] > [Tray Setting].
- Open the MP Tray and keep it open until printing is complete. The MP Tray can be closed after printing has finished.
-
How to print on long paper? (Windows)
- Select the Print command in the application.
- Select the printer model name, then click the Printer Properties or Preferences button. The printer driver window appears.
- Click the Basic tab.
- In the Media Selection field, select Cut-Sheet Paper.
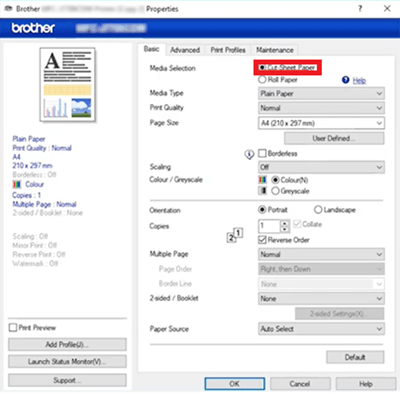
- Click the Media Type drop-down list, and then select the type of paper.
- In the Page Size field, click the User Defined button. Enter the width, height, and other information in the User Defined Size window, and then click Save.

- Click the Scaling drop-down list, and then select the option to enlarge or reduce the page size, if needed.

- For Colour/Greyscale, select the Colour or Greyscale option.
- In the Orientation field, select the Portrait or Landscape option to set the orientation.
- Enter the number of copies required (1-999) in the Copies field.
- Change other printer settings, if needed.
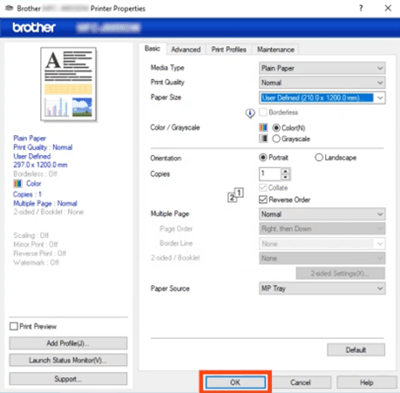
- Click OK.
- Complete the print operation.
You can also watch the video below for visual guidance on the step-by-step instructions:
-
How to print on long paper? (macOS)
- Open the document in the application.
- Click File > Page Setup. The Page Setup window appears.
- Click the Paper Size drop-down list, and then select Manage Custom Sizes.
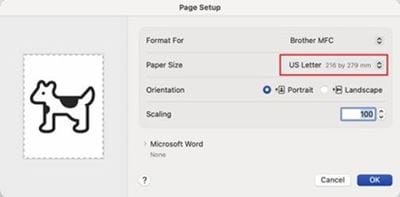
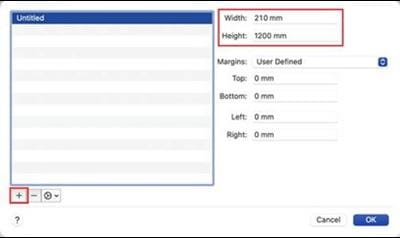
- Click the + icon, then enter the following details for the document, and then click OK.
- Enter a name for the custom paper size.
- Enter the custom paper size.
MFC-J6959DW, MFC-J6960DW and MFC-J6975DW (Width: 88.9 mm - 297 mm / Height: 431.9 mm - 1200 mm)
MFC-J5110DW and MFC-J5115DW (Width: 88.9 - 215.9 mm / Height: 355.7 - 1200 mm). - Enter Margins.
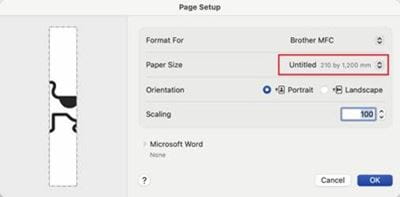
- Select the custom paper size that was created and choose the orientation, then click OK.
- Click File > Print.
- Make sure the correct machine is selected. If a different machine or no machine is selected, click the Printer menu, then select the correct machine.
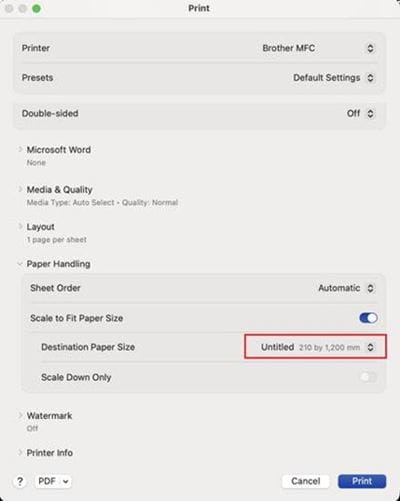
- Under Paper Handling, enable Scale to Fit Paper Size.
- Click Destination Paper Size, then select the custom paper size that was created in step 2.
- Select any other printer settings, if required.
- Click Print to complete the print operation.
-
How do I feed long paper or special print media one sheet at a time?
- Load special print media in this slot, one sheet at a time.
- The machine automatically turns on Manual Feed mode when you put paper in the manual feed slot. Open the manual feed slot cover.
- Slide the manual feed slot paper guides to fit the width of the paper you are using. Load only one sheet of paper in the manual feed slot with the printing surface face up.
- Using both hands, push one sheet of paper into the manual feed slot until the leading edge touches the paper feed rollers. Let go of the paper when you feel the machine pull it. The LCD displays Manual Feed Slot ready.
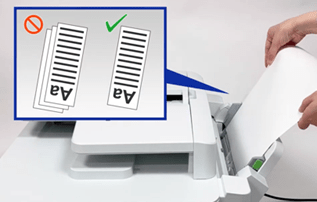
- Read the instruction displayed on the LCD, and then press OK.
When using paper larger than A4 or Letter size, or envelopes
- Pull out the paper support until it locks into place, and then unfold the paper support flap.
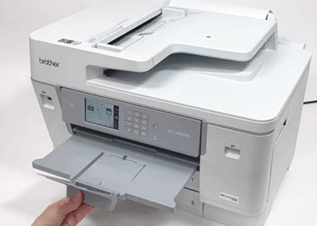
- If the document does not fit on one sheet, the LCD will prompt to load another sheet of paper. Place another sheet of paper in the manual feed slot, and then press OK.
- When paper larger than A4 or Letter size is fed into the manual feed slot, the machine holds the printed page after printing so it does not fall. When printing is complete, remove the printed page and press OK.
- Make sure printing has finished before you close the manual feed slot cover.
The machine will eject paper loaded in the manual feed slot during the machine's cleaning process. Wait until the machine finishes its cleaning, and then load paper in the manual feed slot.
-
How can I prevent colour changes when printing on long paper?
Colour output may shift if ink cartridges are replaced mid-job.
Best practice:
- Check the remaining ink levels before starting long paper or banner print jobs.
- If any cartridge is low, replace it before starting the print.
- Avoid replacing ink cartridges during an active long print whenever possible.
- If consistent colour is critical (e.g. banners, posters, CAD drawings, marketing material), restart the print from the beginning after replacing the cartridge to ensure uniform colour throughout.
-
Why does Windows only show the basic printer driver when printing on long paper?
Long Paper Option Missing or Unavailable in Windows
- Cannot select banner or long paper size.
- Custom paper size option is unavailable.
- Maximum paper length is limited.
- Long paper sizes do not appear in Printing Preferences.
Answer:
The printer may be using the Microsoft IPP Class Driver or another Windows built-in driver instead of the Brother Full Driver & Software Package.
Windows built-in drivers provide basic printing functionality but may not support advanced features such as:
- Long paper printing
- Custom paper sizes
- Full printer settings and options
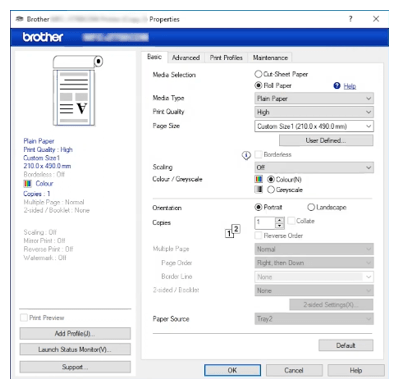
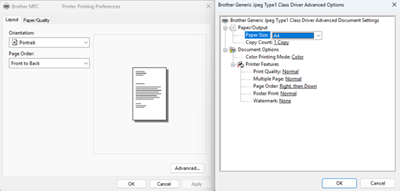
The differences between Brother Driver and Windows built-in driver:
Brother Driver:
Windows built-in driver:
Refer to Print on Long Paper (Windows) video