FAQ: How to print duplex double-sided on Windows and Mac.
This FAQ will step you through how to duplex print on supported Brother printers from Windows and Mac.
-
Windows PCStep 1: Confirm and check that you are using the correct print driver.
Please click on
 Start button > Settings Devices > Printers and Scanners. Click on your Brother Printer > Manage > Printer Properties > Advanced. Next to Driver, ensure the Brother model is selected then click Apply, and then OK
If the Brother model is not on the list, it means that the Brother driver is not installed. Please click on the following link to download the Full Driver and Software Package for your model.
Step 2: Selecting 2-sided when printing a document.- Select the print command in your application.
- Select your Brother Printer, and then click the Printing Properties or Preferences button, the printer driver window appears.
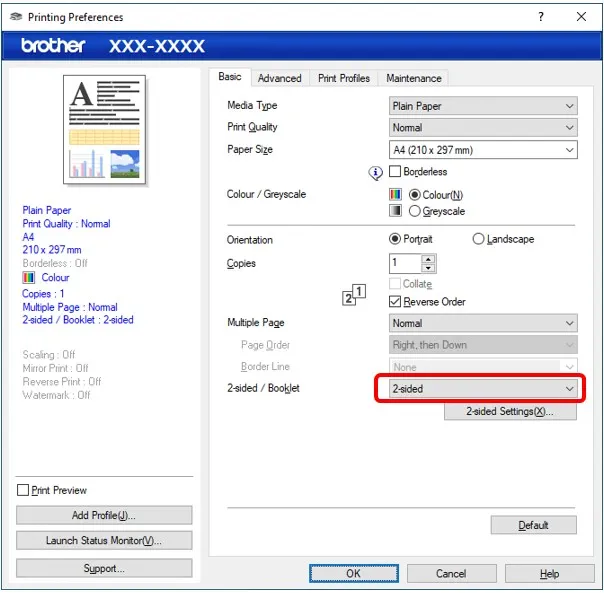
- Click the Basic tab.
- In the Orientation field, select the Portrait or Landscape option to set the orientation of your printout. If your application contains a similar setting, we recommend that you set the orientation using the application.
- Click the 2-sided / Booklet drop-down list, and then select 2-sided.
- Change other printer settings if needed.
- Click OK.
- Then complete your print operation.
- Please click on
 Start button.
 - Click on Settings.
- Click on Devices/Bluetooth & Devices.
- Click on Printers and Scanners.
- Click on your Brother printer model.
- Click Manage (Depending on the version of Windows this step may be skipped).
- Click on Printing Preferences, select the 2-sided option and then click on Apply/OK.

-
Mac OS
Step 1: Print double-sided with your Mac.
- With an application or document open on your Mac, choose File > Print, or press Command-P.
- Select your Brother printer. Note: For more page setup options, click the Show Details button.
- Select the Orientation option that matches the way you want the document to print.
- Depending on the application and the MacOS version options may differ:
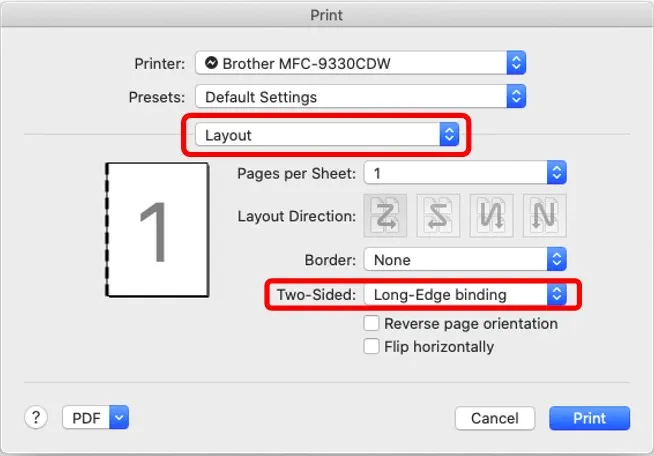
a. Click the application pop-up menu, and then select Layout.b. Choose On from Double-sided pop-up menu.

- In the Two-Sided section, select the Short-Edge binding or Long-Edge binding option.
- Change other printer settings, if needed.
- Press Print.

- On your Mac, open a document, then choose File > Print.
- Choose the 2-sided print settings you want to save as a Preset, you can refer to Step 1: Print double-sided with your Mac.
- Click the Presets pop-up menu, then choose Save Current Settings as Preset.
- Set a name for the Preset i.e. 2-sided print.


